Choose Your Chronulator
Most people get the complete kit, with meters. But if you're experienced with electronics, here are some other options:
- Complete kit, without meters – You supply your own meters.
- Circuit board only – You supply all other parts.
- Pre-programmed microcontroller – You supply all other parts.
- Analog panel meter/gauge – You supply all other parts.
- Build from the schematic (free!)
You can also buy an assembled Chronulator, or an assembled "micro" ChronulatorSMD that fits into very small places. Keep reading for more details. And be sure to look at our instructions, templates, sample artwork on the Chronulator support page.
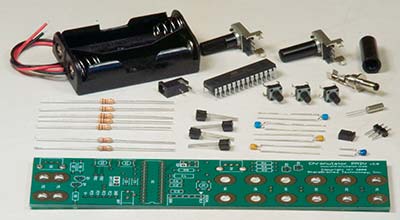
Chronulator kit, complete
If you want to learn how to solder, this kit is an excellent choice. "Standard" Chronulator meters are included. If you have your own meters, see the "no meters" kit option below.

We provide:
- Chronulator circuit board
- Electronic components (pre-programmed microcontroller, resistors, crystal, transistors, capacitors, connectors, battery adapter)
- Two panel meters
- Detailed instructions, schematics, source code, templates, and sample artwork
You provide:
- Soldering iron and solder
- Framing or mounting tools and materials
- Two AA batteries
You do:
- Solder components to circuit board
- Solder and assemble battery adapter
- Customize and print meter labels (a inkjet printer works well)
- Glue labels onto meters
- Bolt meters to circuit board
- Mount clock into frame or mount
- Install batteries into adapter
- Plug battery adapter into circuit board
Chronulator kit, no meters
This is a more advanced kit, for those who supply their own meters. This requires testing your meters and tweaking the Chronulator circuit to provide the correct output current. You'll also need to wire the meters to the board, as the holes in the board probably won't match. We also suggest getting a wall/mains power adapter, especially if your meters draw more than a few hundred microamps (AA batteries won't last very long).
We provide:
- Chronulator circuit board
- Electronic components (pre-programmed microcontroller, resistors, crystal, transistors, capacitors, connectors, battery adapter)
- Detailed instructions, schematics, source code, templates, and sample artwork
You provide:
- Meters (ammeters which require no more than a few milliamps, or meters which can be modified by removing the meter's internal resistor)
- Soldering iron and solder
- Framing or mounting tools and materials
- Two AA batteries
You do:
- Solder components to circuit board
- Solder and assemble battery adapter
- Customize and print meter labels (a inkjet printer works well)
- Glue labels onto meters
- Bolt meters to circuit board
- Mount clock into frame or mount
- Install batteries into adapter
- Plug battery adapter into circuit board
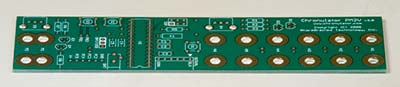
Chronulator circuit board
For the truly hard-core among us. You'll have to find and buy all your own electronic components and meters. You'll also need to program the microcontroller chip on your own.
We provide:
- Chronulator circuit board
- Detailed instructions, schematics, source code, templates, and sample artwork
You provide:
- Electronic components (microcontroller, resistors, crystal, transistors, capacitors, connectors, battery adapter)
- Meters (ammeters which require no more than a few milliamps, or meters which can be modified by removing the meter's internal resistor)
- Soldering iron and solder
- Framing or mounting tools and materials
- Two AA batteries
You do:
- Solder components to circuit board
- Solder and assemble battery adapter
- Program microcontroller
- Customize and print meter labels (a inkjet printer works well)
- Glue labels onto meters
- Bolt meters to circuit board
- Mount clock into frame or mount
- Install batteries into adapter
- Plug battery adapter into circuit board
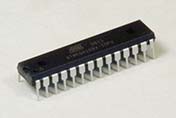
Chronulator pre-programmed microcontroller
If you want to source your own parts, but don't have a way to program the Atmel ATmega168V microcontroller, you can get a pre-programmed microcontroller from us.
We provide:
- Pre-programmed Atmel ATmega168V microcontroller
- Detailed instructions, schematics, source code, templates, and sample artwork
You provide:
- Electronic components (resistors, crystal, transistors, capacitors, connectors, battery adapter)
- Circuit board, breadboard, or other circuit wiring
- Meters (ammeters which require no more than a few milliamps, or meters which can be modified by removing the meter's internal resistor)
- Soldering iron and solder
- Framing or mounting tools and materials
- Two AA batteries
You do:
- Solder components according to circuit schematic
- Solder and assemble battery adapter
- Customize and print meter labels (a inkjet printer works well)
- Glue labels onto meters
- Bolt meters to circuit board
- Mount clock into frame or mount
- Install batteries into adapter
- Plug battery adapter into circuit board
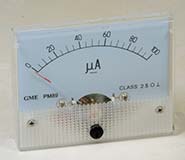
Chronulator meter
If you're buying your own components or otherwise don't want a [#pm2v-kit-complete">kit][], this is an easy way to get the meters we designed the kit around. You will need to buy two of these meters to build a single Chronulator kit.
We provide:
- One 100uA analog panel meter
- Detailed instructions, schematics, source code, templates, and sample artwork
You provide:
- Electronic components (microcontroller, resistors, crystal, transistors, capacitors, connectors, battery adapter)
- Circuit board, breadboard, or other circuit wiring
- Soldering iron and solder
- Framing or mounting tools and materials
- Two AA batteries
You do:
- Solder components according to circuit schematic
- Solder and assemble battery adapter
- Customize and print meter labels (a inkjet printer works well)
- Glue labels onto meters
- Bolt meters to circuit board
- Mount clock into frame or mount
- Install batteries into adapter
- Plug battery adapter into circuit board
Chronulator, assembled
For those without soldering skills, we provide a pre-assembled kit. A few simple customization tasks are required to finish the project.
We provide:
- Assembled Chronulator circuit board
- Two panel meters
- Assembled battery adapter
- Detailed instructions, schematics, source code, templates, and sample artwork
You provide:
- Framing or mounting tools and materials
- Two AA batteries
You do:
- Customize and print meter labels (a inkjet printer works well)
- Glue labels onto meters
- Bolt meters to circuit board
- Mount clock into frame or mount
- Install batteries into adapter
- Plug battery adapter into circuit board
ChronulatorSMD, assembled
If you need a Chronulator board that fits in a really small place, this is it! A few simple customization tasks are required to finish the project. Read more about the ChronulatorSMD on Keith Brown's site.

We provide:
- Assembled ChronulatorSMD circuit board
- Two panel meters
- Support via Keith Brown's Web site
You provide:
- Framing or mounting tools and materials
- Battery case
- Two AA batteries
You do:
- Solder battery case to ChronulatorSMD board
- Solder current-range resistors to ChronulatorSMD board
- Customize and print meter labels (a inkjet printer works well)
- Glue labels onto meters
- Wire meters to circuit board
- Mount clock into frame or mount
- Install batteries into adapter
- Plug battery adapter into circuit board